I. Introduction
Installing a ceiling fan is a practical and energy-efficient way to enhance comfort in your home. Whether you’re replacing an existing fan or adding a new one, this step-by-step guide will walk you through the process of installing a ceiling fan safely and efficiently.
II. Gather the Necessary Tools and Materials
Tools:
-
Screwdriver
-
Adjustable wrench
-
Wire stripper
-
Voltage tester
-
Ladder
Materials:
-
Ceiling fan kit
-
Mounting bracket
-
Screws
-
Wire nuts
-
Ceiling fan-rated electrical box
-
Wire connectors
-
Ceiling fan remote (if applicable)
III. Turn Off Power
Locate the Circuit Breaker: Go to your electrical panel and locate the circuit breaker that controls the power to the room where you’ll be installing the ceiling fan.
Turn Off Power: Switch off the power by flipping the corresponding circuit breaker to the “off” position. Use a voltage tester to double-check that the power is off before proceeding.
IV. Remove Existing Fixture (If Applicable)
Detach the Existing Fixture: If there’s an existing light fixture, remove it by unscrewing it from the electrical box. Disconnect the wires and set aside the old fixture.
Inspect the Wiring: Examine the wiring in the electrical box to ensure it’s in good condition. If necessary, replace the electrical box with one rated for ceiling fans.
V. Install the Mounting Bracket
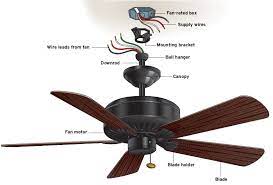
Position the Bracket: Attach the mounting bracket to the electrical box using the screws provided in the ceiling fan kit. Ensure the bracket is securely fastened.
Secure the Fan Mounting Bracket: Hang the fan mounting bracket on the secured bracket. Tighten the screws to ensure stability.
VI. Assemble the Ceiling Fan
Follow the Manufacturer’s Instructions: Refer to the manufacturer’s instructions to assemble the ceiling fan. Typically, this involves attaching the fan blades to the motor housing and securing any additional components.
Connect the Wires: Connect the wires from the fan to the corresponding wires in the electrical box. Typically, this includes connecting the black (hot), white (neutral), and green or bare copper (ground) wires.
VII. Mount the Ceiling Fan
Secure the Fan to the Bracket: Lift the assembled fan and align the holes in the fan’s mounting bracket with the screws on the mounting bracket attached to the ceiling. Secure the fan in place by tightening the screws.
VIII. Attach Fan Blades
Install Fan Blades: Attach the fan blades to the motor housing using the screws provided. Ensure the blades are evenly spaced for balanced operation.
IX. Connect the Wiring
Match Wire Colors: Match the wire colors from the fan to the corresponding wires in the ceiling electrical box. Secure each connection using wire nuts. Typically, black to black, white to white, and green/bare copper to ground.
X. Install the Fan Canopy
Cover the Wiring: Secure the fan canopy over the motor housing to cover the wiring and ceiling bracket. Use the provided screws to attach the canopy to the mounting bracket.
XI. Test the Ceiling Fan
Restore Power: Turn the power back on at the circuit breaker.
Test the Fan: Test the fan and light (if applicable) to ensure they are functioning properly. If you have a ceiling fan remote, check that it operates the fan and any additional features.
XII. Adjust Fan Settings
Adjust Fan Direction: Most ceiling fans have a switch on the motor housing to change the direction of the fan blades. Adjust the switch according to the season—counterclockwise for cooling in summer and clockwise for circulating warm air in winter.
XIII. Conclusion
Installing a ceiling fan is a rewarding DIY project that can improve the comfort and energy efficiency of your home. By following these step-by-step instructions and adhering to safety guidelines, you can enjoy the benefits of a well-installed ceiling fan in your living space.
FAQs
Q: Can I install a ceiling fan without a mounting bracket? A: No, a mounting bracket is essential for safely installing a ceiling fan. It provides a secure foundation for the fan and ensures stability during operation.
Q: What size ceiling fan should I install in a room? A: The size of the ceiling fan depends on the dimensions of the room. Measure the room’s square footage and choose a fan size that matches the room size. Generally, larger rooms require larger fans.
Q: Is it necessary to turn off the power before installing a ceiling fan? A: Yes, it is crucial to turn off the power at the circuit breaker before installing a ceiling fan. This ensures safety by preventing electrical shocks during the installation process.
Q: Can I install a ceiling fan on a sloped ceiling? A: Yes, many ceiling fans come with an option for installation on sloped or angled ceilings. Follow the manufacturer’s instructions for the specific kit or hardware required for sloped ceiling installation.
Q: Do I need a professional electrician to install a ceiling fan? A: While many homeowners can install a ceiling fan as a DIY project, if you are unsure about electrical wiring or encounter difficulties during installation, it’s advisable to seek the assistance of a professional electrician for safety and compliance.
Source Links:

